The making of Shakey: a Realtime, Massively Multiplayer, Shakespearean parlour game
At Culture Hack Scotland (#chscot) last weekend, we won most playful and the grand prize for a real-time game we made using Rails, JavaScript and Pusher. For a bit of background read this post.
I thought it might be interesting to break down the technical details of how it was developed and worked. Bear in mind that apart from a tiny bit of prep work, all the code in this project was coded in 16 hours - so the architecture/code will not be optimal.
Credit where it’s due, the code and architecture I am talking about here was created by myself, Rory Fitzpatrick and Jim Newbery, with a little help from Phil Leggetter of Pusher.
The Premise
The idea of the game was thus:
- On a big projector screen would be an image of a theatre stage complete with actors and audience.
- Players register by visiting a url on their phones.
- Players are assigned to be in the cast, or in the audience, and appear on the big screen using their twitter avatars.
- The game starts
- The actors then recite a short piece of Macbeth, reading the lines from their phones as they are prompted to do so.
- The audience have the option to throw tomatoes/flowers depending on how well they think the cast members are doing.
Getting Started [Midnight friday]
Since we wanted a game that worked in real-time, with multiple devices communicating with each other, we quickly settled on using WebSockets, which allows JavaScript on the browsers of two devices to talk to each other. We quickly settled on using Pusher which is a hosted solution for implementing websockets easily. We were pretty pleased with that decision as it was easy to use - the only drawback being no fallback support for the default Android browser (unless Flash lite is installed).
The rest of the app (serving assets etc) was served from a rails app running on heroku. Here’s a very rough diagram detailing the architecture.
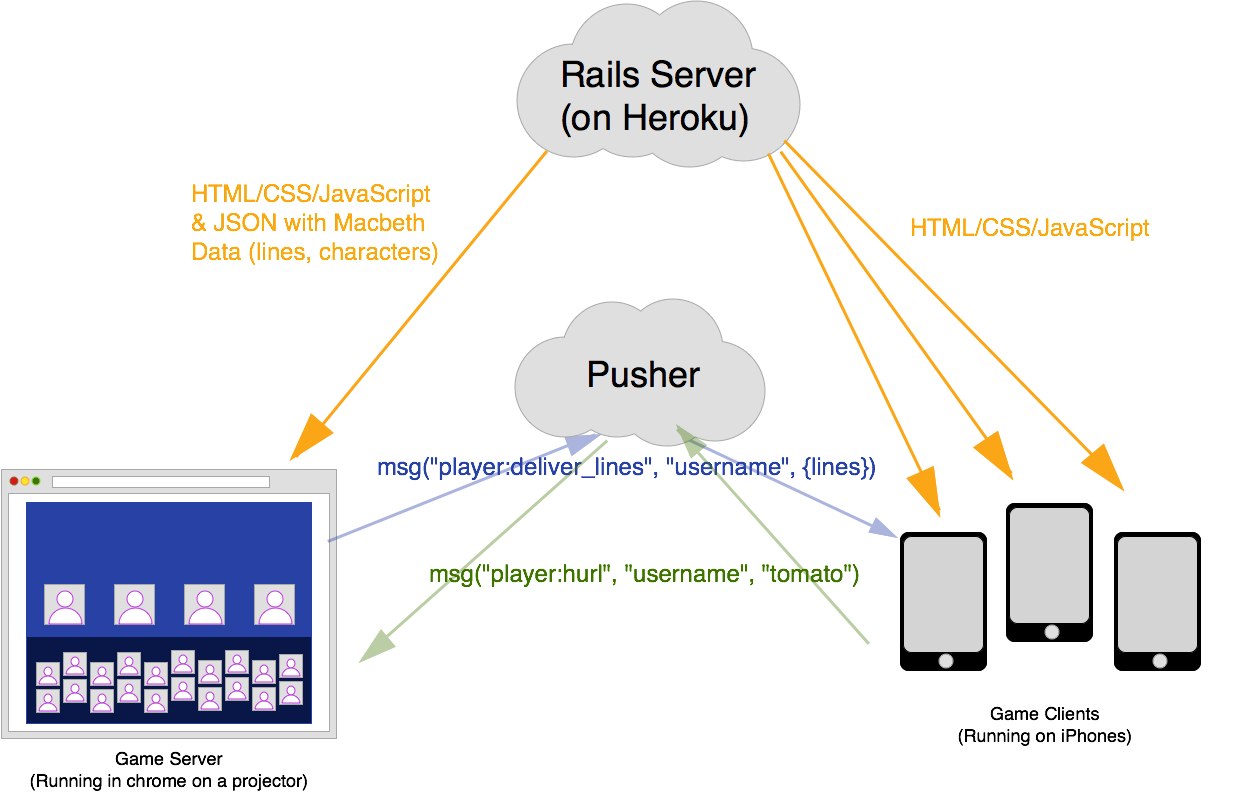
I’ll explain what’s going on a bit better below.
Getting up and running with Pusher [1am Saturday]
I quickly spiked out some JavaScript code to demonstrate two browsers talking to each other with pusher.
Pusher is essentially a PubSub implementation on top of WebSockets. Pusher’s normal operating mode is that you would have your server sitting on the internet somewhere Publishing messages to a channel, and browsers (the clients) Subscribe to those messages.
In Shakey however, we wanted the game server to be running in a browser (the left hand side of the image above), so as far as Pusher is concerned, even our game-server is a client. (Yup, it is confusing, try figuring this out at 2am, after cocktails!)
This requires setting up pusher to enable client to client messages. The process for this is:
- When setting up your pusher channel, make it a “presence” or “private” channel. A presence channel allows for client-client messages, and is suitable for games where you need to know “who” is speaking/listening.
- Presence channels require your users to be authenticated (you don’t want any old Joe Bloggs sending messages to your other users. To do this Pusher hits an endpoint in your app (/pusher/auth), where you must check the logged in user, and tell Pusher about them (using the Pusher gem makes this easy, more info here.
Once you have setup your presence channel and authentication, you can now talk to each other, as an example:
Open game_server.html in one browser, and game_client.html on another, and an alert will appear on the server’s window with the message “Hello, world!”.
Baby Steps
Now that we had very basic communication between a server and a client working, we could comfortably split into two teams. To keep ourselves straight, we wrote down all the messages we would need to run the game, they were.
Sent from the clients
// register a new user
"player:register", "<username>"

// audience member wants to throw flowers
"player:hurl", "<username>", "flowers"

// a cast member has finished reading their lines
"player:exuent"
Sent from the game-server
// starts the game
"scene:start"

// announces which role the user is going to play
"player:assignRole", "<username>", "audience/cast"

// player should start reading lines
"player:deliver", "<username>", {lines: '---'}

// ends the game
The beauty of having a nicely event-driven architecture like this was that Rory and I could develop the game-server, completely oblivious of what Jim was doing with the messages, and vice-versa.
Indeed, Jim wrote his game-clients in JavaScript, and we wrote the game-server in CoffeeScript and it didn’t matter a bit.
Building out the server
Now that we had the messaging setup, and the protocol designed, Rory and I focused on building out the game-server. It’s responsibilities (roughly in order) were:
- Grab the current scene we were going to act out, along with the characters in it.
- Listen for “player:register” events, and when one was heard, assign the new player to be in the audience or cast, and announce it to them by triggering a “player:assignRole” event”.
- Wait for someone to click the “start” button, and when it was pressed, trigger a “scene:start” event to everyone, followed by a “player:deliver” event to the first cast member, who needed to speak, with their lines.
- While someone was speaking, listen for “player:hurl” events, and trigger the appropriate fart-noise and animation on the screen to indicate something had been thrown at the current speaker.
- Wait for “player:exuent” events, and when one was heard, send a “player:deliver” event to the next speaker.
- And so on.
We built the server using Backbone.js, as it makes breaking up the code into Models (for us Player and Game), Collections (of Players) and Views (the animated Player avatars on the screen) easy.
The event driven architecture was really useful again on the game-server. We wanted to add a “news-feed” down the side of the display, with things like “@philip_roberts threw a tomato”. This was in the end trivial, as we just had another little bit of JavaScript, completely independent from the rest of the game, listening for “player:hurl” events only, and updating a list when it did so.
Building out the clients
We left Jim to build out the game-clients that would be running on people’s phones. It’s role was pretty much the inverse of the server:
- Register a user by sending “player:register” events
- Wait to find out which (“player:assignRole”) role it had been assigned
- If it was a cast member, wait till it received “player:deliver” events and display the lines to the player, and wait for the player to press “done”, thus triggering “player:exuent”
- If it was an audience member, display “throw flowers”, “throw a tomato” buttons, and trigger “player:hurl” events when clicked.
The game-clients were also built in Backbone.
Done [4pm Saturday]
Apart from some awesome visual polish, that was pretty much it. I’ve neglected to show much real code here, as it’s pretty hideous, but you can dig into the repo.
Caveats, lessons learned
A few things tripped us up using Pusher that are good to know if you are doing something similar.
- First, the presence channel and client setup isn’t that hard, but takes a minute to get your head around.
- When using a presence channel, all clients receive all events. You can’t just send an event directly to a single client. In our case that meant we always sent the “username” of the intended client along with the data, and the client on the other end filtered out messages that weren’t intended for them. We could have set up separate channels for each player, but decided this was simpler to manage.
- The exception to the above is that the client that sends a pusher event, doesn’t receive the event itself. We tried to listen to events published by the game-server (which is a client remember!) within a different part of the game-server, and it doesn’t work. It’s easy fixed by using non-pusher events, but confusing when you bump into it.
- Because Pusher is hosted in the cloud, all your development/testing/production servers will be using the same pusher account (unless you setup different pusher accounts (we didn’t)). This gets pretty mind boggling when 3 people are testing code on three separate machines, but they are still all interacting. We could have fixed this by setting up different channel names on each machine, but we didn’t figure that out at the time.
- 3G providers really like to screw with your internet. Before the demos everyone was asked to not use WiFi on their phones - which was less than ideal as companies like O2 like to smush websocket traffic not sent over encrypted connections. Pusher will fallback to an encrypted connection if unsecured doesn’t work, but to ensure that it worked first time, Phil Leggetter from Pusher suggested we force encrypted connections: First encrypt the Pusher socket and then serve all the assets over ssl (easy done with heroku, just stick https in front of the urls).
And finally
If you have any questions about what we did, (or if you want the four of us to make you an ace multiplayer game!), just get in touch on twitter.